Blog posting on your WordPress site is super easy if you follow these simple steps…
The first step you will want to do is to write your blog post in word. I have created a great worksheet for you to use so that you will have everything at your fingertips when you go to add your post.
Write your post in its entirety on this form and be sure to use spell check as the search engines do not like spelling and grammatical errors. Plus it just doesn’t look professional to have them on your website.
Follow these steps to get started:
1. Log into your wordpress site
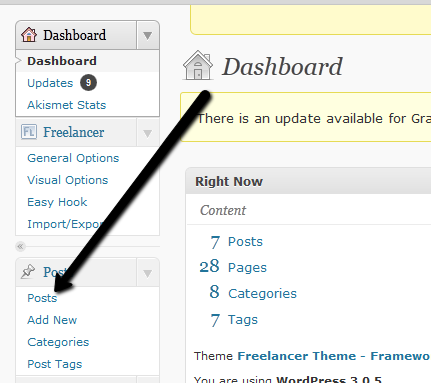
2. On the dashboard click on Add New under the Posts section.

3. Then wordpress opens up your post.
4. Add the title of your post to the page. If you want to read an article I have written about how to write a good title click here to read it. It is important to have one of your keywords in the title of your blog post.

5. The next thing you will want to do is to copy and paste your blog post into the content area of your blog. You do not want to copy and paste it directly out of your word document as word has formatting that may show up in WordPress incorrectly.
And you will want to use notepad or text edit to paste your post first to remove any formatting done by word. Then click on the HTML tab and paste your post there:

6. Then you will want to click back on the visual tab which will take you back to where you will format your article as you have it written.
7. Once you have your article written you will want to save it as a draft to make sure everything is on there and you don’t lose any of your work. Actually it is a good idea to save it several times as you are working to avoid the headache of losing your work and having to start all over!

8. Once your article has been formatted, you will want to add your photo(s) to your article. Place your cursor at the beginning of the line where you want to justify it with your text when you upload the photo in the next step.
9. Then click the add media button:

This gives you the option to upload photos, videos and audio or a form if you have a form plugin set up for your site. You can upload the either from your computer or by clicking on the media library you can upload files previously uploaded into your WordPress Media Library.
10. Once you are in you can add media files directly from your computer or your Media Library
11. Locate the photo that you want to use on either your computer and upload. Or select the photo from your media library and click show and then you can decide what size you want it to be and where you want to place it on your post.
12. If you are uploading a new photo from your computer you will want to add the Alt text for your photo which is the words that people will see when they hover over our photo. Optimally this should include on of your keywords.
Then select where you wan the photo to be positioned on the page by selecting the alignment butto.
As for size, this is a personal preference. Generally, I like to keep my post photos to the thumbnail size. However for this post since I am using them to show you how to do something, I have made them larger. It really is up to you. I do recommend keeping this consistent for all of your blog posts.
13. At this point and all along the post process, I recommend saving your post as a draft and previewing the post and making style changes.
14. Then you will want to add the rest of your information to the post to make it as SEO friendly as possible. Here are the steps:
- Meta Title – this is what you want the search engines to show when your post shows up. So treat this like a headline that you want to attract people to click on and go to your site. It must be relevant to your post though!
- Keywords – enter those in that are relevant to your article
- Add categories by clicking on the over on the right hand side and if you have new ones, then click on that and add your new keywords. This gives readers the opportunity to search for articles by category.
- Add Tags – I like to start by selecting the most often used tags, the ones that we want you to show up for in the search engines. Then if you have any that should be added, go ahead and add them here.
15. Once this is done and your post is formatted, you are ready to either publish your post or schedule it to be posted at a later date. If you are writing multiple blogs at a time, you can use the scheduling function so that they do not publish all on the same day.
You do not want to publish multiple posts on a single day for SEO optimization purposes. Your site is much more appealing to the search engines when you publish on multiple days rather than on a single day.
16. To schedule a post to be published at a later day and time just follow these simple steps:

a. Click on the edit next to the publish immediately in publish box over on the right hand side of the post page.
b. Then date and time appear in the boxes and you can edit them and click okay.
c. When this is done all you need to do is to click the blue schedule button. If you do not do this it will remain as a draft post.


