In a previous post I wrote about why you need to set up a dashboard system for your coaching business. Now it is time to get started building your gmail dashboard. The first thing we want to do is to make sure your email accounts for your business are all centralized in your gmail account.
For peace of mind and fewer distractions I suggest that you separate your email accounts into business and personal. What I recommend here is to keep your personal stuff out of your dashboard system for your business.
I am assuming that you already have your google account set up. If not, then go get one right now at: http://google.com.
The Simple Guide to Setting up Email Accounts in Gmail
Step #1: Import your yahoo, comcast, aol and other web based emails into your gmail account
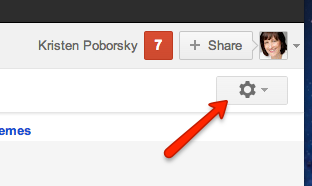
- Click the Settings gear in Gmail over at the top right hand side under your.
- Select Settings from the menu that appears.
- Go to the Accounts tab.
- Click Add a POP3 mail account you own
- Type your web based Mail address under Email address:.
- Click Next Step ».
- Type your password under Password.
- Click add account and you’re done!
Step #2: Add your hosted emails into your gmail account
This is where you add any emails that are associated with your website – ie Kr*****@*************ky.com. For this set of instructions we need to break it down into two parts. How to add your email account if it is ( 1.) hosted with Godaddy or (2.) if your host uses a control panel.
Here’s step by step how to set up your Godaddy hosted emails in gmail:
- Log into your godaddy account to set up your web based email.
- You’ll want to set it up or make changes to an existing account by changing it to a forwarding email so when you delete the email inside of gmail it gets deleted off your hosting server.
- Log in to your Account Manager.
- Click Email.
- Next to the account you want to use, click Launch.
- If an option to add addresses or view all email plans displays, click View All to display all of your email plans.
- On the left, click Forwarding Plans to use a forwarding plan you have already set up, or click Unused Forwarding, under the Unused Plans folder to use a new plan.
- Click Add next to the Email Forwarding account you want to use.
- On the Settings tab, complete the following and then click OK:
- Forward Address — Enter the name of your email address
- @ — Select the domain name you want to use – ie gmail
- Forward Mail to: Enter the email address you want the messages forwarded to
Then go into your gmail account and do the following:
- Click the Settings gear in Gmail over at the top right hand side under your.
- Select Settings from the menu that appears.
- Go to the Accounts tab.
- Click Add a POP3 mail account you own
- Type your Dodaady Mail address under Email address:.
- Click Next Step ».
- Type your password under Password.
If your email provider uses a control panel, then here’s how you set them up:
- Click the Settings gear in Gmail over at the top right hand side under your.
- Select Settings from the menu that appears.
- Go to the Accounts tab.
- Click Add a POP3 mail account you own
- Type in your hosted email address
- Click the Next button.
- Enter your full email address as the Username.
- Enter Password for your email account.
- Enter the POP Server. This will be your domain name proceeded by “mail.”
- Choose any additional options you may want
- Click the Add Account button
Configure your outgoing mail in google by doing the following:
- Choose ” Yes, I want to be able to send mail as jo**@*****le.com“
- Choose if you will use this address as an Alias. – I recommend choosing no
- Click the Add account button.
- Choose to send “Send through example.com SMTP server”
- Enter the SMTP Server. This will be your domain name procded by “mail.”
- Enter your full email address as the Username.
- Enter Password for your email account.
- Choose Port 25 (Non SSL) or 465 (SSL).
- Click the Add Account button